
INSPIRATION PHOTO/PLAN:

George Comstock House
239 Park Avenue, Bridgeport CT
built in 1887
It’s a parking lot now…so sad.
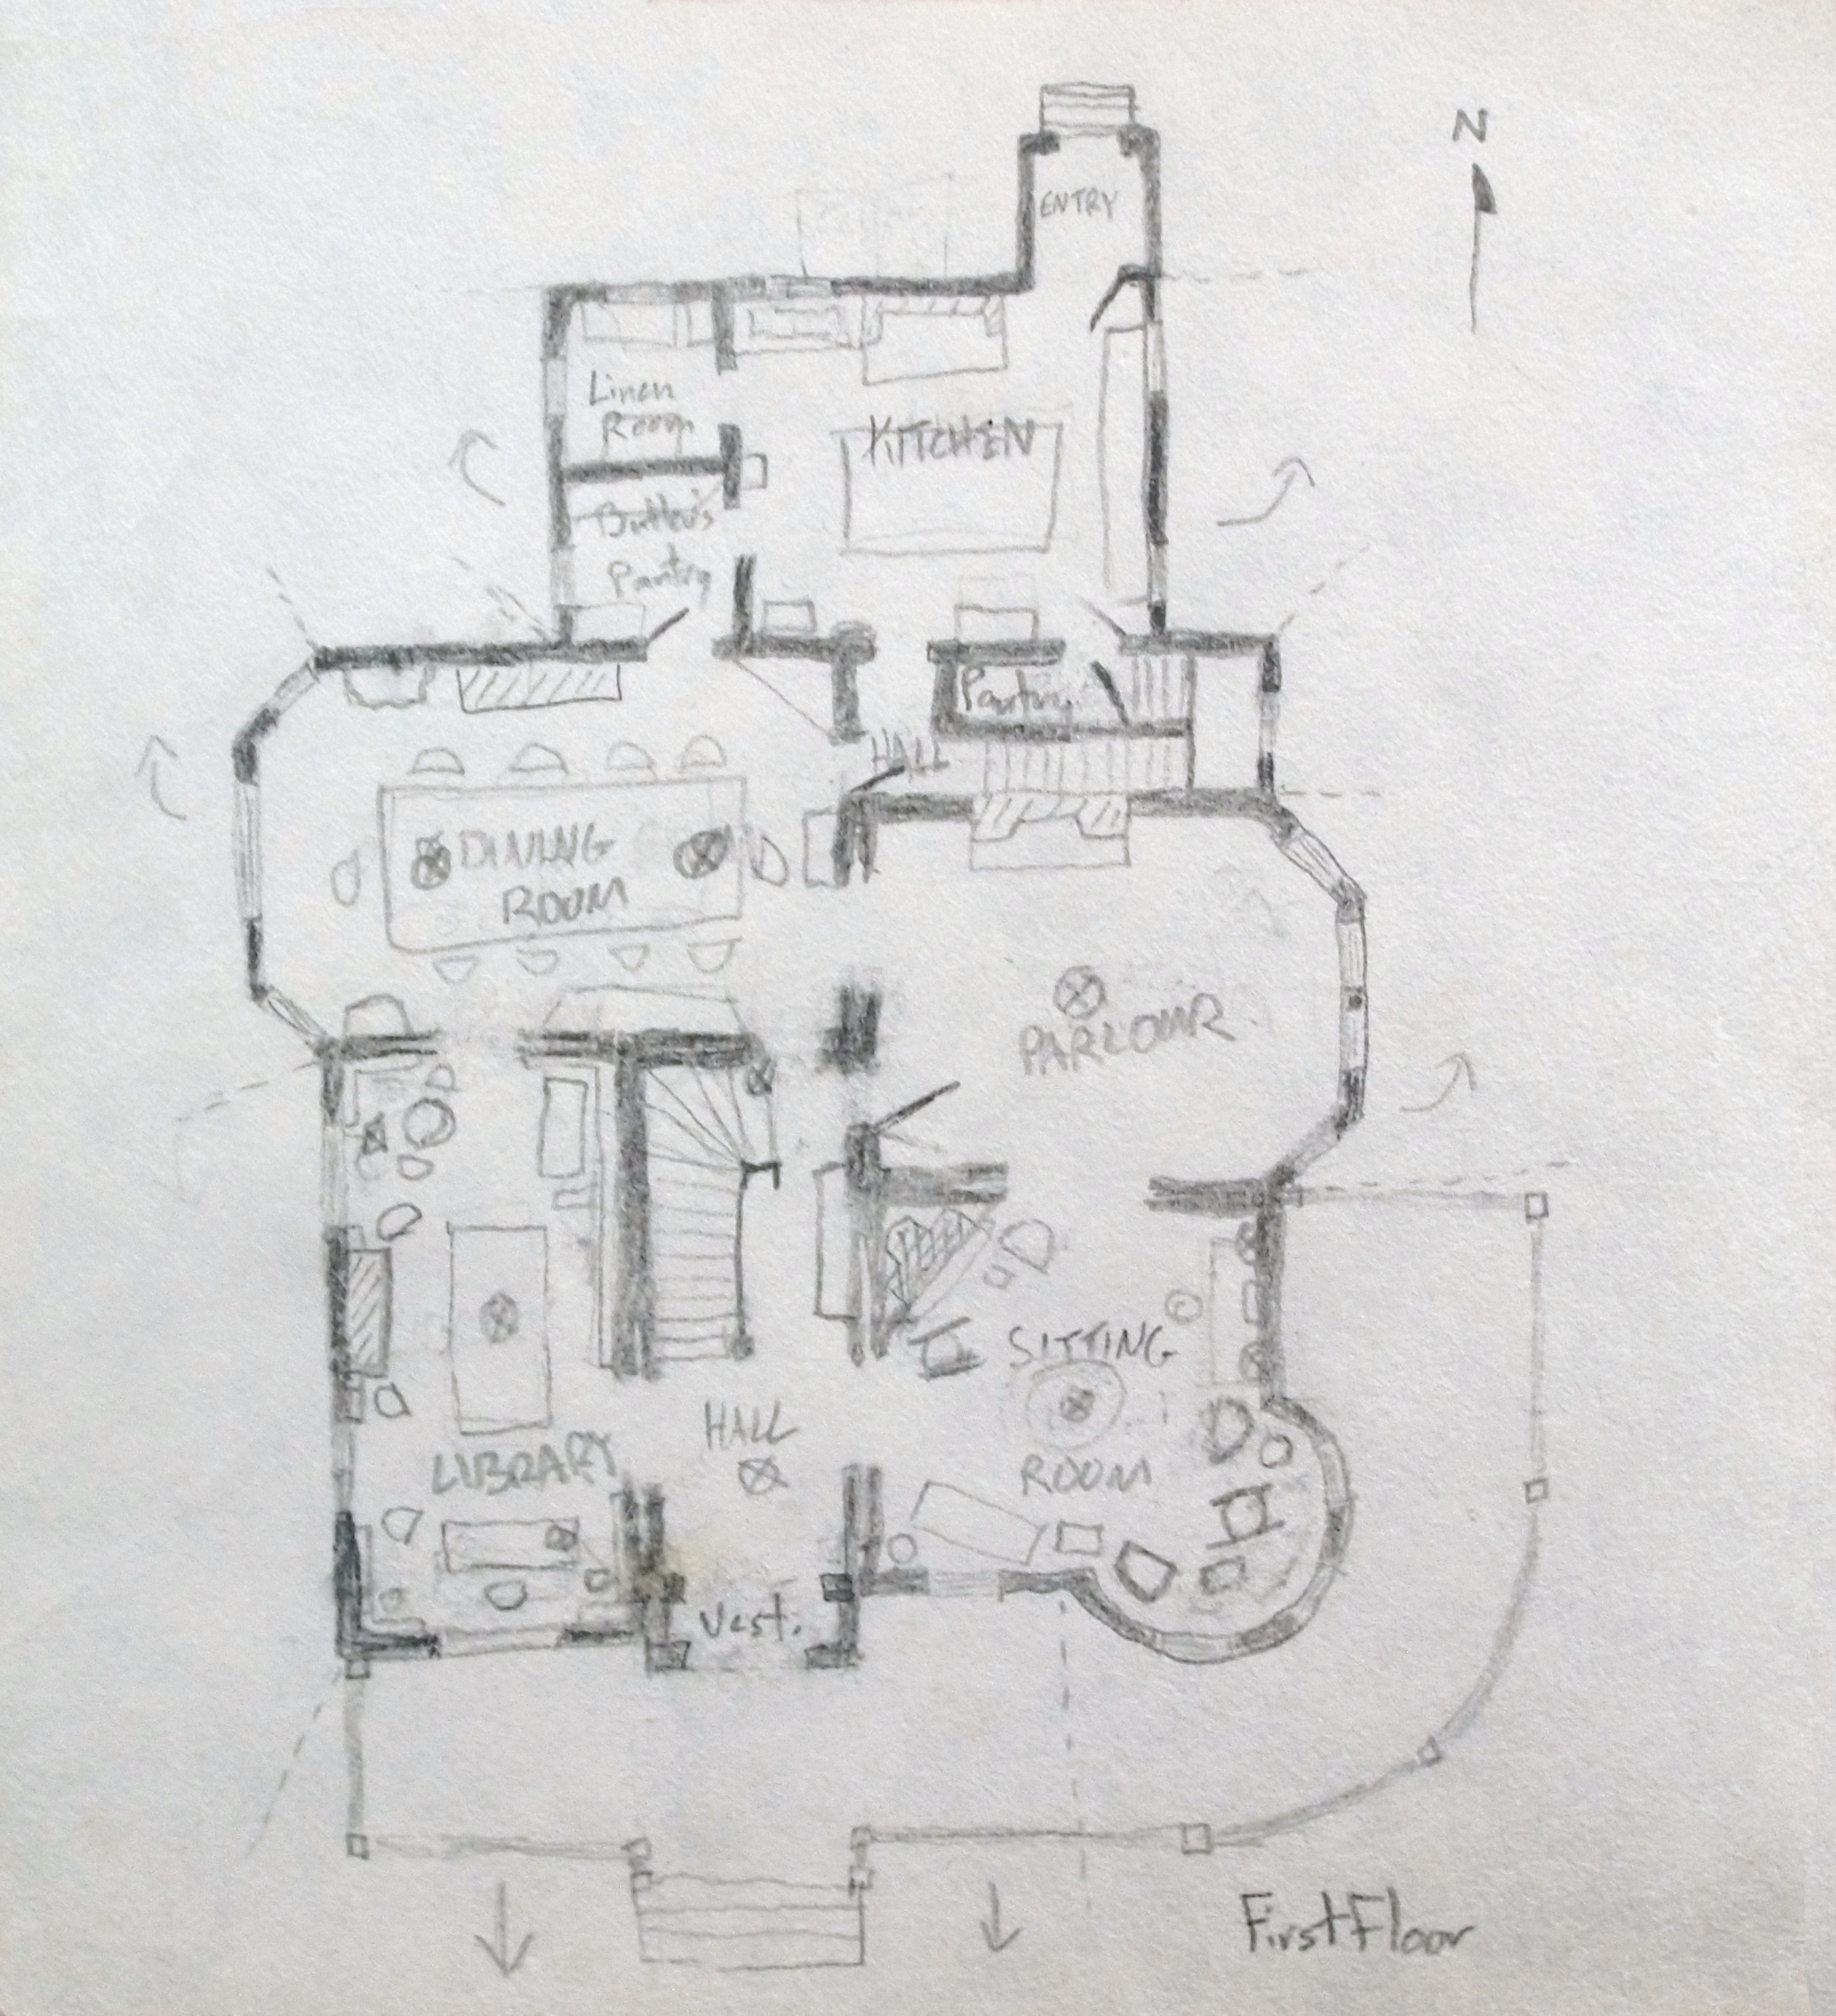
ACTUAL PLANS:

First Floor

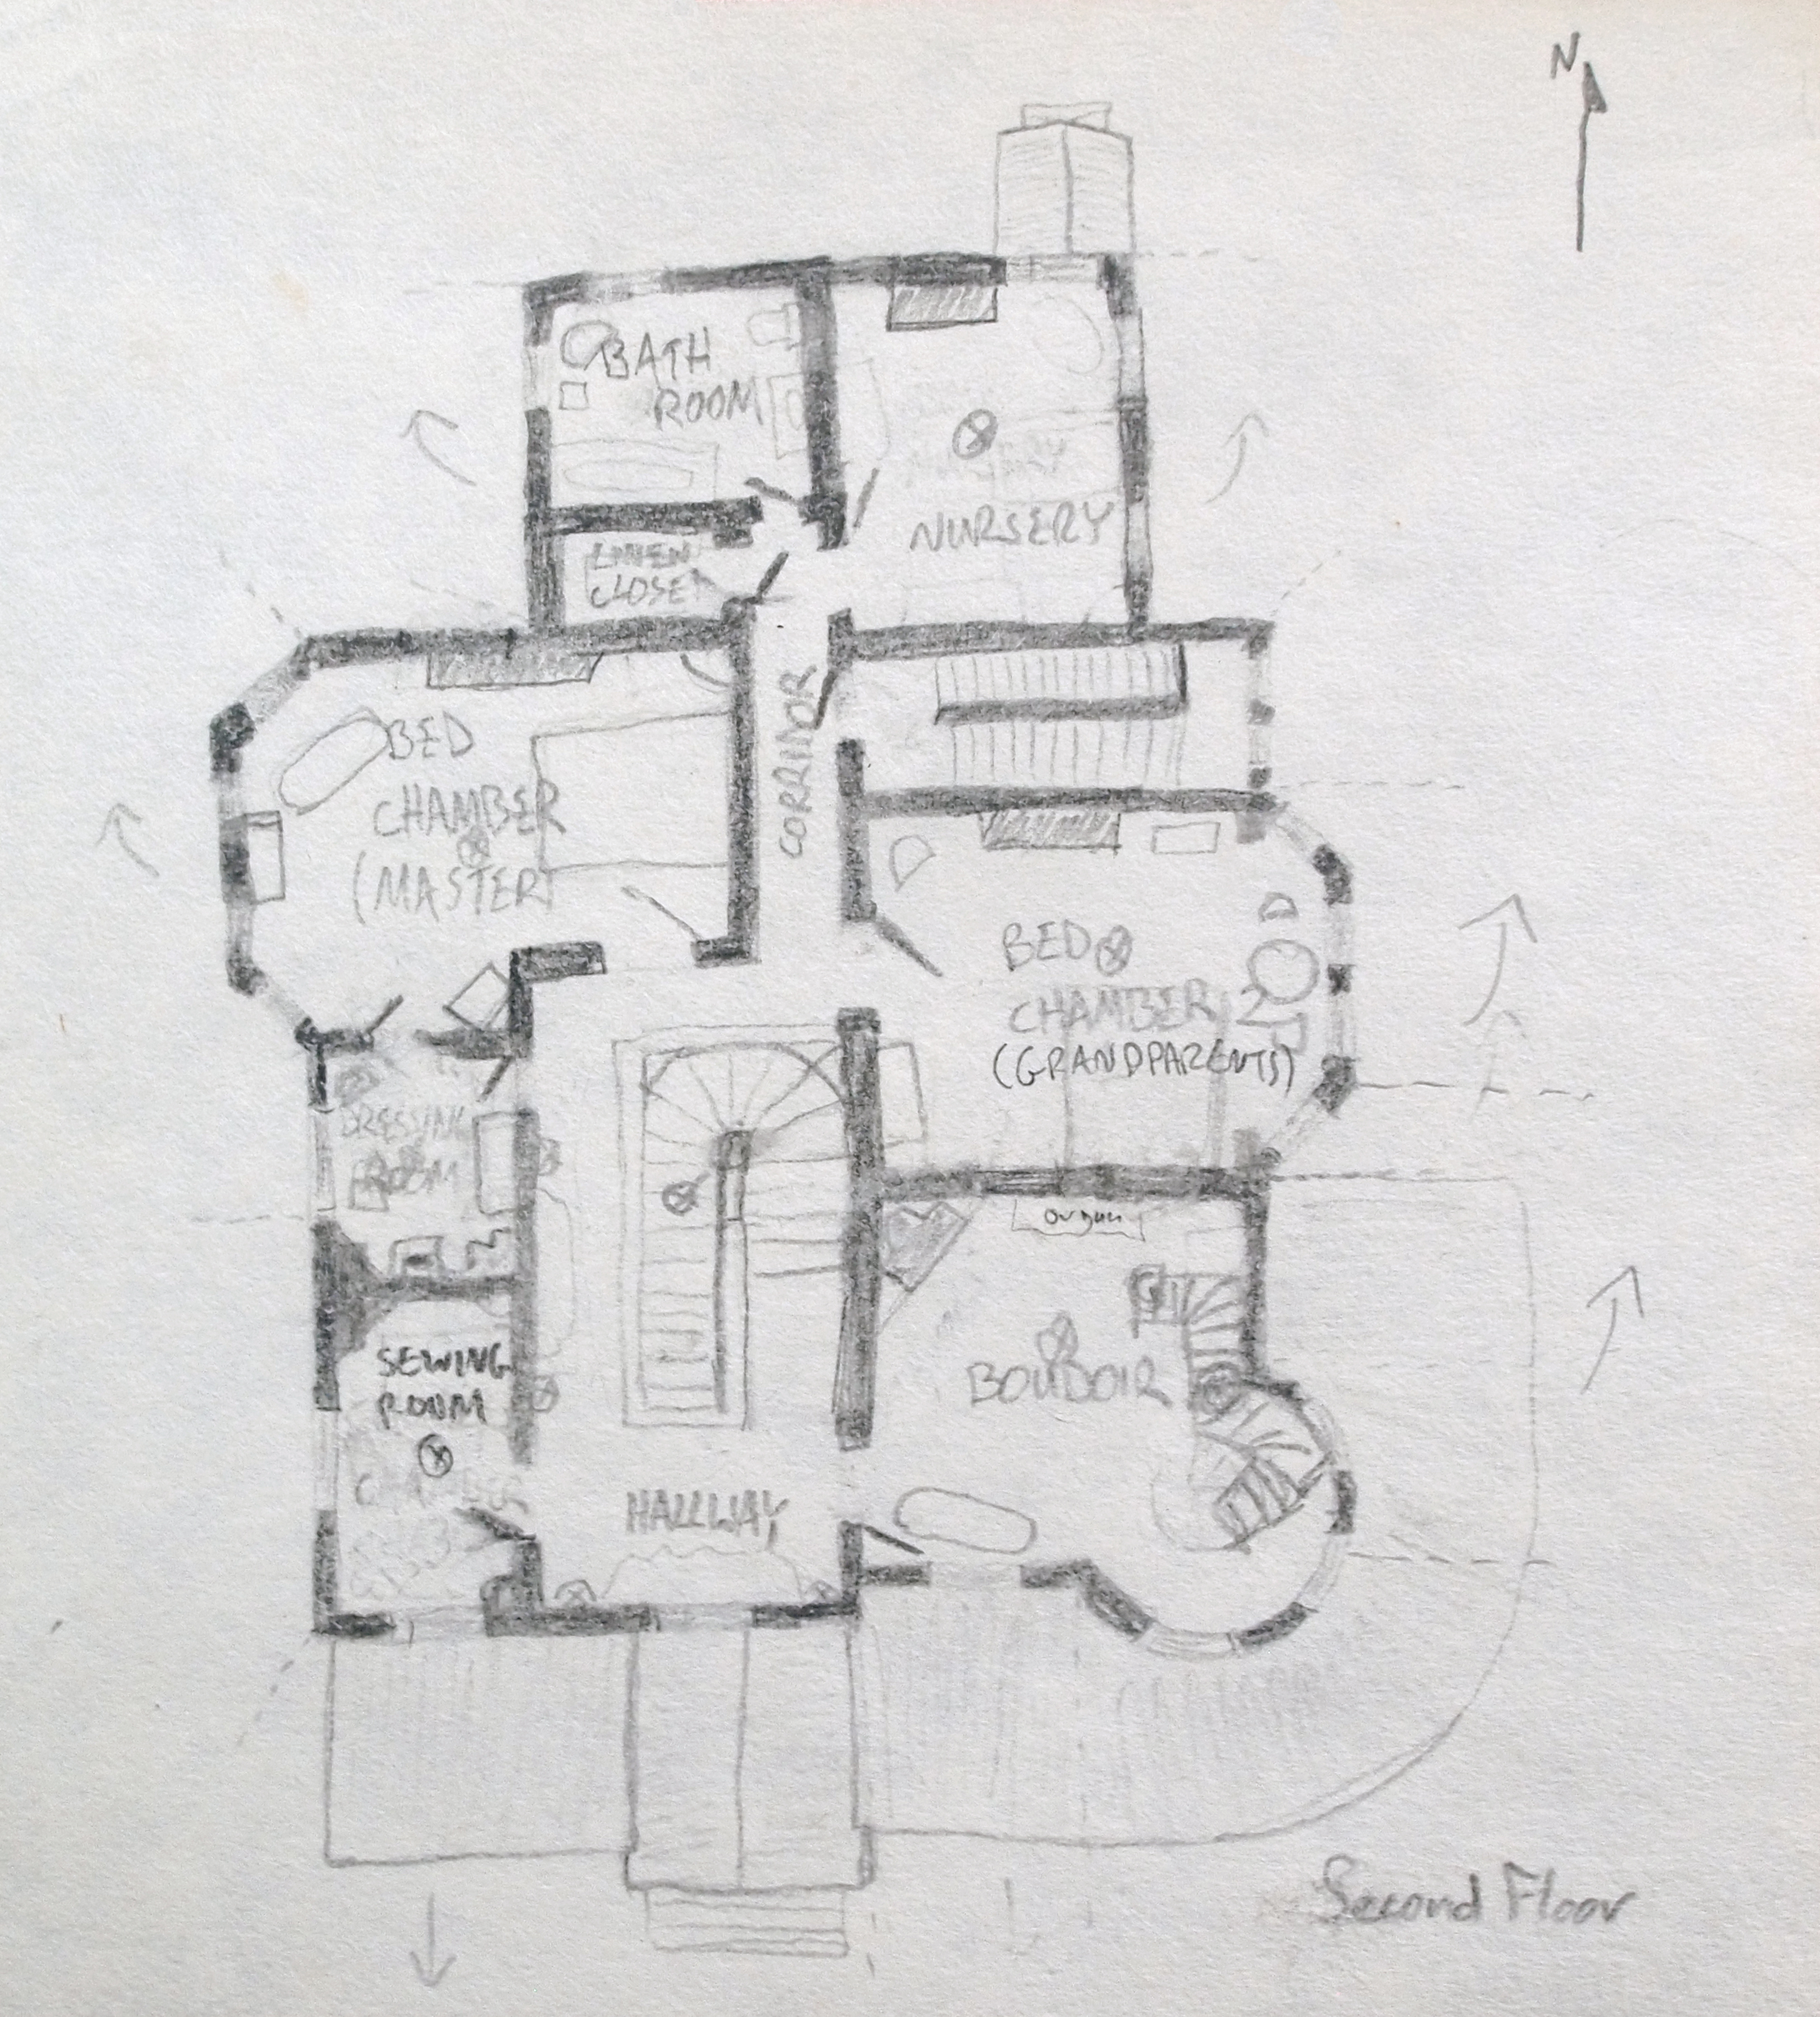
Second Floor

Third Floor

First floor, north side

Second floor, north side
ORIGINAL FLOOR SKETCHES:


This is such a cool project!
Thanks…I’m having fun!
I just found your blog while searching for inspiration for my own Victorian dollhouse. I’m curious how you’re planning viewing the rooms (or not). I’ve been trying to figure out if swinging panels or one open side would work for my imaginary house.
Hi there! Sounds like you have a fun project in the works. I had to make the same decision. I was originally going to make seinging walls that opened up into the rooms, but since my house opens on two (opposite) sides, that would have meant I needed a large amount of room around the house in order to be able to look in. So I decided to leave the walls open instead. If you’re just having one side open, that shouldn’t be a problem for you, though. Enjoy!
Thanks for the information! I’ve been reading your blog and been very impressed by your meticulous attention to each room and the architectural accuracy.
My current dollhouse is a open-back colonial without any perspective or depth (very “dollhousy”) so I’ve decided to add some during renovation. My debate for this one is how to protect the open side. I see you have a giant plexiglass box. I probably don’t have room for that, unfortunately.
Meanwhile, I’m planning my next build.
That’s going to be a big project I am interested in how you will be able to see all of those rooms. Do you plan on having the whole house enclosed with panels that open up to give you access or complete sections that remove on each side. I have the real good toys Queen Anne which I have been working on for 9 years I did a lot of remodeling on it, I added a bay window on the one side for the dining room and a stained glass window for the bathroom and on the third floor since it had such a high ceiling I dropped the ceiling down and added two low attics and placed a conservatory on the roof that is my artist loft that has a drop down staircase I also added an extra gable to the side of the house. I’m working on getting my drapes done as for that the interior is finished and I have everything pulled together to start work on the exterior. My house is so large and the rooms at the front of the house can only be accessed through opening panels on the side they are just big enough to view and place the furniture but you could never paint or wallpaper it, that all had to be done during the final construction phase. I just hope you have a good plan for all those rooms that will be hard to get to so you will have to have your wallpapers and paint colors already picked out when you start putting it together as you’ll never be able to get to them, and you need a good electrician to do all of your wiring during the building process as well it’s going to be very involved
Thanks for stopping by and thanks for the comments. It sounds like your miniature house must be gorgeous! I am not going to close the outside walls except on the front and back. On the sides, there will be parts of the outside walls, but with openings for each room so you can look inside. That way I don’t have to deal with any removable parts and can leave the entire house under an acrylic cage to help preserve it over the years. The only room that will not have a direct opening ot it will be the entrance hallway, but with double doors in front, you will be able to see inside that way.
Great
Not a miniature modeler but I stumbled on this when I was looking for something to build in Minecraft. I know this post is three years old, but I wanted you to know I find your notes very useful. I had no idea how to tackle the roofline from the original image itself. Thank you so much!
Thanks! The notes were originally meant to be useful for me when I stopped working on the house and took it up again. So I could figure out how I had done things before. So glad they were helpful to you, too!
Not sure if you will even get this comment… But this is the exact copy of my home! I about fell out of my chair when I saw this pin! Feel free to contact me. I would love to talk about the home and the plans you have! I’m happy to share pics of my home!
I should specify, this is my actual home I live in, not a model, lol.
You’re kidding? You live in this house? In Connecticut? Yes, I’d love to talk. Wow!
Are you still on wordpress? I’d love to talk. My email is juliettedade@yahoo.com
From the looks of the layout, I’m guessing to turn this into an accessible dollhouse, first make roof removable by lifting off. Put the parlor/sitting room//bedroom/music room block on hinges to swing open since that’s a squared area….Put the dressing room/sewing room//library//servants bedroom block on hinges to swing open….etc with north-west side of building. I’m liking the enclosed idea with various points of entry for staging contents…I would love seeing this in half scale!!!!
Yeah, so my only problem with that idea, which I was originally thinking of doing, is that the swinging doors/walls would take so much space that I would need a huge room for the finished dollhouse. So I decided instead to leave the room walls open but fill in the outside walls between the rooms with outside finishing. That way you can “peek in”. Also, I set the attic rooms up so they line up with gable walls, so I don’t need to remove the roof ever once its done. Thanks so much for checking in and for the suggestions!
Thank you so much for this great post! I’ve been writing a story, and trying to clarify my mental map of the house it’s set in. The few points I was quite clear on were making it very hard to find a house from the right era, with the right rooms, in the right style — but after a couple of years of looking on and off, I found your post. And picked up more of an interest in the history of house plans along the way… Cheers!
That is soooo cool! Glad I could help the creative process.
Hi.
I absolutely love this design and am trying to make one myself (out of cardboard as practice then wood)
If I ever get the chance to build my own actual house this is very close to my dream design.
I’m hoping you could help explain the third floor as I can’t work out how it adds on without weirdly overhanging the second floor
Obviously the tower needs to align up but from there I am stuck.
I’m just working out the floors and outdoor walls at this stage.
Thank you for any help you are willing to give
Hi there! How exciting that you’re starting your own! Hours of creative fun! The third floor has gables on three sides (over the library, over the dining room, and over the drawing room. So those rooms would have slanted ceilings but would be tall enough to live in. Hope that helps.
I really wish I knew what the interior looked like, and, how it differed from a house I’m about to purchase. It’s claimed to be built in 1873, and built slightly less ‘tudor’ than this one. I am not sure if it is an 1873 home or made to mimic this variation… it’s confusing. I tried to check local records (online), but I can’t find who built it/when.
Interesting. I wish we knew what the inside looked like, too. I hope you get it figured out.
I was looking for victorian house plans for a Sims build and fell in love with this. I modified it a bit for the game but I just wanted to say thank you for sharing this, it’s beautiful.
So glad it worked out for you!!
how do you get into the tower room?
There is a staircase in the room under the tower room. This is done in many Victorian houses like this one.
I have this picture and was wondering its worth
You mean the original picture of the house published in the Scientific American journal? Probably not much, unless someone particularly wants it.
I have this pic and was wondering its worth
Joy Jamison did this on YouTube ! A gingerbread demo a couple of years ago. She gave the dimensions etc. your post here gives me even more info!
Hii, I know that this post is over 11 years old, but I was looking for something to build in the sims and this is perfect! Thank you! You’ve done a great job, I’m in love!
Yay! Glad it could inspire you!
ok, i have to know how to get to the tower room though.
Ha ha! I had the same issue when I first saw the plans. I did a lot of research and finally found photos of similar houses where there was a set of stairs leading up to it from the room below it.
OMG I found this on pinterest last year & started building it in the sims, but for the life of me couldn’t figure out the roofing… I JUST NOW learned there is a third floor. It all makes sense now… haha
doing the same hopefully it worked out for you , building it on hounds head
I started looking for designs for making a miniature home for my Girlfriends cat (which is solid black, and she likes spooky stuff), and stumbled across this gem. I just wanted to let you know that I will be using these plans to make it. It will ofcourse exclude the interior, since a cat will be residing in it, but instead it will have a cushy bed inside. I plan to make some subtle changes like dark and weathered paint for the exterior, and curtains that block most of the interior from view, as so the cat has a nice and comfortable hiding spot to go to when he’s had enough of people for the day, but some windows will allow him to spy when he is inside. Like most cats, he likes to hide inside boxes and bags, but that looks tacky and sometimes even makes the place look trashy, so I wanted to use this to make something that not only gives him his own space to hide in, but also give a better look to the actual home itself, so it doesn’t look like it is just full of empty boxes and bags everywhere.
would like to know more about how the roof was designed however.
What a cool, excellent idea!! Lucky cat! I have no idea about the roof…I figured I would wing it when I got to that part. If you do figure it out, do let me know. Enjoy the build!
thanks, and I believe I figured out the roof, actually. I drew up a concept earlier thie morning, and I think it will work. Could let you have it, once I figure out how to post it on here, lol.
you can also email if you’d like. I’d be very interested in what you’ve come up with! Email: juliettedade@yahoo.com
literally building this in SIMS. I absolutely love Victorian houses